FFXIV Hotbar Layouts and Keybinds (Mouse and Keyboard)
One of the most common questions I see players asking is how they should set up their hotbars in FFXIV. They might be brand new to the game, or they might be picking up a new Job for the first time and they want to know what buttons make sense to place where.
While it might sometimes be a frustrating answer, the truth is that the best layout is whatever is most comfortable for that player, and that might be a little different for everyone. Keybinds and hotbar layouts are extremely customizable, so I strongly encourage you to play around and try stuff out to find a good fit.
For this post, I’ll be going through my own keybind and hotbar setup so you can see my thought processes and have something to work off of when you’re building your own setup.
Keybinds
Hotbar Keybinds
Keybinds are very closely intertwined with your hotbar layout. You’re going to associate your skills with their hotbar slot and where it is on the screen, but you also need a keybind associated with that slot so you can, you know, press the button and do the thing. You can set these up under System > Keybind > Hotbar.
Each hotbar has 12 slots, so I recommend setting your hotbar keybinds to 12 buttons that are relatively easy and comfortable for YOU to press.
Unfortunately you cannot set keybinds on a per-Job basis; if you set hotbar 1’s keybinds up a certain way, then that’s what they are for all your Jobs, even if you don’t have that hotbar set to ‘shared’.
The default keybinds for your first hotbar are ‘1-9’, ‘0’, ‘-‘, and ‘=’. I don’t know about you but I find that ridiculously impractical if my keyboard hand is always resting above WASD. I cringe when I see somebody using the default keybinds because…ouch, your hand.
I would much rather be able to reach everything comfortably with the fingers on my keyboard hand. I’m going to show you what I use as hotbar keybinds because it made sense to me, but again, you may have to tinker a little bit before you find something that feels exactly right for you.
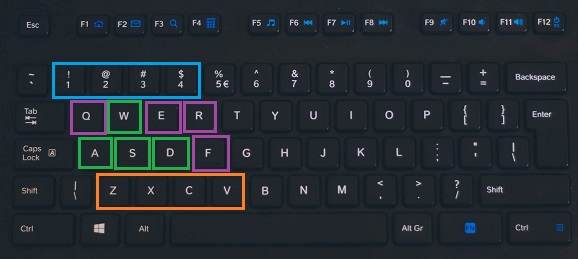
I love this setup because it allows me to mentally break up my hotbar keybinds into three sections.
I tend to place my frequent Weaponskills and Spells in the blue top section (1, 2, 3, 4), my important cooldowns tend to go in the purple middle section (Q, E, R, F), and my less frequently pressed cooldowns go in the orange bottom section (Z, X, C, V). ‘C’ and ‘V’ are still very easy to press with my index finger, so I often use them for important or more frequently used oGCDs.

I use a shift modifier with all those same keys on my second hotbar, and a ctrl modifier on my third hotbar. Both modifiers are held with my pinky finger, but you may want to consider the Alt modifier instead, which might be more comfortable for you if you’d rather use your thumb to hold the button.
The modifiers allow me to divide my hotbar keybinds into sections across even more dimensions. I can have a group of Shift+1, Shift+2, Shift+3, Shift+4, but I could also have a group of 1, Shift+1, Ctrl+1. That will come in handy when assigning Job actions, since every Job is a little different.
I did break the trend for one slot and snuck in a secret keybind on the third hotbar. I was finding Ctrl+Z to be a slightly awkward button combo to press naturally, so I replaced that keybind with Shift+Mouse3, which is much more comfortable for me.
I’m fine with this keybind being on a Job-specific hotbar because I can use it for little one-off Job actions that kind of fall under the same category, so I can instinctively press it when I’m thinking “I need to do XYZ” in combat.
Three hotbars is a total of 36 slots, which should be enough for any Job’s skills. I think Scholar comes the closest to filling it up, but I still have a couple empty spaces.
I also highly recommend setting up an extra hotbar for some of your shared keybinds. These are actions you’ll be using frequently on every Job but that don’t already have a keybind shortcut.
For example, on my extra hotbar I place and keybind Sprint, Mount, a second Mount (for variety, or to use a multi-seater), and Limit Break. I also put several User Macros on this bar so I can do things like examine a player or toggle HUD elements with a single button press.
System Keybinds
There are tons of useful keybinds for actions that don’t need a hotbar, too, and they might still get a lot of use while you’re in combat! Under System > Keybind, check out the various tabs to set up some seriously useful button presses. I’ll go over some of the functions I think are most important, but you may have different priorities depending on how you play.

Remember, the more frequently you use something, or the quicker you need to press it, the closer it should be to your hand’s default position (WASD). Once I’ve assigned all my hotbar keybinds, I start looking for the next layer out on my keyboard for my frequently used actions.
Some of these easily accessible buttons get used on my fourth hotbar for shared keybinds, and other buttons get used on system keybinds I use frequently like movement and targeting. In general, buttons you don’t need often or while in combat can be pushed farther and farther over to the right side of the keyboard.
Movement
In this section I would check out the Strafe Left/Right keybinds. The defaults are Q and E but I took those for my hotbar actions and never bothered to replaced the Strafe keybinds. I personally don’t miss them at all but I’m sure other players might get a lot of use out of them.
You’ll want to know what your Run/Walk toggle button is, especially for Eureka/Bozja, but it’s rarely used so putting it on a far away keybind should be fine.
I use Auto-run all the time so I put it on ‘T’ which is very accessible.
I don’t personally use it, but see if you might get some use out of Flip Camera in this section as well. In combat it can sometimes help you keep an eye on mechanics, and out of combat it’s just fun to use to look at your character.
Targeting
A way to cycle through enemies is important, and I’ve been fine with the default Tab cycling.
Targeting party members with F keys (F1, F2, etc.) could be useful, but personally I prefer to click their names in the party list (more on that later).
‘Target the Target of Your Current Target (Assist Target)’. I get SO much use out of this one that I set it to ‘G’ so it would always be on hand. When I play a Healer this makes bouncing between the enemy and the Tank super quick, and it’s also useful when a fight has a tankswap because it always targets whoever currently has aggro.
Targeting the nearest NPC or object is a sneaky little function you can use when players are crowded around a summoning bell or quest NPC. I set it to something out of the way (‘-‘) since it’s rarely an urgent situation.
Setting and targeting your Focus Target are two keybinds that are useful in combat. As such, I put them on Shift+B and B, relatively closeby keybinds.
As a Healer, I use them to make sure I can always see my Tank’s buffs and debuffs and quickly target them no matter what’s happening. As a DPS, I usually focus the boss so I can switch back to it after attacking adds, regardless of finicky camera angles preventing tab targeting or accidentally clicking on a party member with my mouse.
Shortcuts
A lot of these shortcuts can be accessed relatively easily through the menu system. Some elements, like Map, Inventory, and Currency, can also be accessed by clicking on their HUD elements on the screen.

I still use keybinds for some of them anyway; it’s all personal preference.
There are pretty much no universally ‘urgent’ shortcuts, so I would just look through the list and see what menus you personally open frequently, and put them somewhere that makes sense to you.
From my perspective, I find the shortcuts I use keybinds for the most are Teleport, Return, Map, Inventory, Armoury Chest, Chocobo Saddlebag, Crafting and Gathering Logs, Duty (opens the Duty Finder), and Timers (various things like Retainer ventures, Custom Deliveries, Squadron missions, etc.) Set these to whatever you like, knowing that you’ll probably press them a lot.
I was quite happy to shove most of these shortcuts over to the righthand side of the keyboard in favour of giving myself more combat keybinds on the left. The only shortcuts I would consider to be combat adjacent would be Signs (for marking players) and Waymarks (for marking the arena). Even those aren’t typically used in the middle of combat, but you might still prefer them in easy reach rather than navigating the menu.
Chat
If you chat a lot you may want to be easily able to switch chat modes to say, yell, shout, party, alliance, etc. There are also shortcuts (with the Alt modifier, e.g. Alt+P) to temporarily switch, which means that only the message you’re currently typing will go to that chat, but it won’t switch your chat mode.
I don’t think I use any chat keybinds myself; I prefer to just press enter and type the command before the message (/r, /p, /s, /sh, /a, etc.).
System
Remember that ‘target nearest NPC or object’ keybind? There’s a function called ‘Confirm‘ which you’ll use right after that one to interact with the NPC or object, so I like to have them on adjacent buttons.
Keybinds for taking screenshots and hiding your UI (presumably before taking a screenshot) are also located here. I use these pretty frequently, but still on their default keybinds (Print Screen and Scroll Lock).
I also use Log Window Zoom regularly for taking a good look at chat, especially if someone has posted a macro in a learning party.
Cancel Macro could come in really handy if you flub a crafting macro and need to take over your recipe manually.
I set Mute Master Volume to ‘0’ so I could quickly mute the game. Great for taking calls or just when something else requires your attention.
Hotbar
I already went over most of this tab earlier, but I did want to mention that this is where you’ll find keybinds for your Duty Actions I and II which appear in specific duties like Emanation (Lakshmi) or The Bozjan Southern Front. You can keybind these action slots, and I personally prefer to do so rather than click on them. I use 5 and 6 as my keybinds, so I can still reach them in combat.
HUD Layout
You can mess around with your hotbar sizes, locations, and other features by going to System > HUD Layout, selecting each UI Element one by one and clicking on the UI Element Settings gear icon on the right. You can also save multiple HUD Layout slots and copy or switch between them at the top of this window.

I follow a similar system to setting up my HUD layout as I do to assigning keybinds. The more frequently or urgently I need to look at something, the closer it is to the center of the screen, where my attention is usually focused. The less often I need something, the further out to the sides it can go.

Some of the important elements I’ve moved around include my Job Gauge, Party List, Enemy List, Progress Bar, Status Info, Target Info, Focus Target Bar, and of course Hotbars. Here’s an example of what it looks like in combat:

The goal is just to put relevant information near the center so my eyes don’t have to move too much searching the screen for some kind of info. If you play a Healer, you’re probably going to need to keep a close eye on your Party List. Having it near the center where the action is will keep it in sight, and mean you won’t have to move your mouse so much to click on a teammate.
If you’re going to customize your HUD Layout then I highly recommend making sure to look at two specific UI Elements. Status Effects and Target Bar can be split into more detailed sections which can be repositioned independently.
Status Effects is split into three parts. Status Info (Enhancements) includes all your combat buffs and can be useful to see when a party member has buffed you with something like Battle Litany, Divination, Technical Finish, etc.
Status Info (Enfeeblements) includes your debuffs which can be extremely important in endgame content, so I like to enlarge this and put it somewhere pretty central. Status Info (Other) is the last one and includes things like FC buffs, Meal buffs, and other EXP or currency buffs. I put it near the bottom of the screen because it’s not usually critical information.
Target Bar is also split into three sections. Target Info (HP) is your enemy’s HP. If you’d like it to list the remaining HP percentage instead of the enemy’s level, then go to System > Character Configuration > UI Settings > HUD and scroll all the way to the bottom to tick “Display target’s remaining HP percentage”.
Target Info (Progress Bar) is your enemy’s cast bar. For boss fights this can be extremely important, so I have that UI Element front and center to make sure I don’t miss an upcoming mechanic. Finally, Target Info (Status) has all the enemy’s buffs and debuffs, and can be really useful to see when someone else has debuffed the boss with Trick Attack, Chain Strategem, etc.
Hotbar Sharing
You can quickly adjust hotbar sharing without going through the whole HUD Layout one element at a time. Instead, go to System > Character Configuration > Hotbar Settings > Sharing.
Job-Specific Hotbars
I have four hotbars that are not shared, and I find that sufficient for holding everything I need on a particular Job. The first three hotbars hold the combat keybinds, and I reduced their size and pushed them near the bottom of the screen.
The fourth hotbar I use to keep track of my important cooldowns, and I make this one a little larger and put it closer to the middle of the screen where my attention is usually focused. I recommend using the ‘hide unassigned slots’ function if you do something like this.
Let’s talk about the first three hotbars where the skills are bound. I find that the trick to placing your Job actions on your hotbars is to use your hotbar keybinds to cluster certain similar skills together based on what they do or how you use them.
Again, remember that the more frequently you press something, the easier a keybind it should have. You can probably put that 180s cooldown on a slightly more awkward Ctrl modifier, and leave a slot like the Q keybind open for something you press every 30s or less.
With my hotbar keybind setup from earlier, I have all sorts of groupings that I can divide the hotbars into if I need to wrap my head around any Job’s set of skills. The best piece of advice I can give is to put similar skills in the same slot or group of slots. This is easiest to illustrate with Role Actions, but I’ll give several examples.
Since the three hotbars use the same keybinds just with different modifiers, this also makes these categories very easy to understand visually, assuming you have them placed above or below each other.
The role actions Interject, Reprisal, and Low Blow are on R, Shift+R, and Ctrl+R. The role actions Rampart and Arm’s Length are always on C and Shift+C, my Tank Stance is on Ctrl+C. My ranged attack, Provoke, and Shirk are always on Q, Shift+Q, and Ctrl+Q. You get the idea.

Tanks in particular are very similar to each other and have a lot of skills that are used in the same scenarios. I always have my main combo on 1, 2, 3. I always have the 30% damage mitigation skill (Vengeance, Sentinel, Shadow Wall, Nebula) on Z. I always have party mitigation (Divine Veil, Shake it Off, Dark Missionary, Heart of Light) on Shift+V.
If you play multiple Jobs, you’ll find various skills you use in similar situations, and putting them in similar places can make it easy to remember where they are if you’re picking up a Job for the first time, or just for the first time in a while.
In fact, several Jobs have party-wide mitigation or a defensive support skill that can fit in that slot. Aside from all the Tanks and Healers, you’ve got Troubadour (BRD), Tactician (MCH), Shield Samba (DNC), and Mantra (MNK).
Many Jobs also have some sort of pre-battle stance as well. The Tanks have their Tank Stances, but there’s also Hide (NIN), Blood of the Dragon (DRG), Closed Position (DNC), and Diurnal or Nocturnal Sect (AST).
I think of the F key (+ modifiers) as my ‘restore/sustain’ category, so I put Tank stuff like Clemency, Equilibrium, Abyssal Drain, or Aurora there, and of course all the Invulnerability skills are on the same button, Shift+F.

If I switch over to a Healer I still have that ‘restore/sustain’ mindset and keep quick healing oGCDs in the F key category, using the basic F key for short single target cooldowns (Tetragrammaton, Essential Dignity) that I reach for often, and the modifiers for AoE oGCD heals.
I also swap out the Tank’s role actions on my R keys for stuff that all the Healers have: Swiftcast, Raise, and Rescue.
If you look at the Q key (+ modifiers) on any of my Healers you’ll see that’s where all the buttons for their job resource are. The Q, Shift+Q, and Ctrl+Q slots are used for WHM’s lilies (Afflatus Solace, Afflatus Rapture, Afflatus Misery), SCH’s aetherflow (Lustrate, Indomitability, Energy Drain), and AST’s cards (Play, Minor Arcana, Redraw).
Remember that one-off keybind I swapped in on the combat hotbar? I think of that as kind of a ‘I need to place something’ button, and use that keybind for any manual ground placement AoE (WHM’s Asylum, SCH’s Sacred Soil, AST’s Earthly Star, etc.).
Not every Job has a skill like that, so I also use it for any ‘backflip’ action (DRG’s Elusive Jump, SAM’s Hissatsu: Yaten, RDM’s Displacement, etc.). I found that these two categories generally didn’t overlap, so I wouldn’t have any Job with two skills competing for that slot.
By finding similarities across Jobs and noting the frequency of your button presses, you can easily mix and match Job actions to your keybind groupings in whatever way makes the most sense to you.
Example Hotbar Layouts by Job
Bard (BRD)
Bards are on the higher end of jobs when it comes to button presses per minute, but the majority of those are on just a handful of buttons, so make sure those are on very comfortable keybinds.

I placed the most frequently pressed actions on the hotbar with no modifier. Bloodletter (E), Empyreal Arrow (C), and Pitch Perfect (Q, once you’re in Wanderer’s Minuet phase), are the most frequent oGCDs so they’re on the comfiest keybinds.
I think of the Shift modifier as my hotbar for AoE versions of things, so Ladonsbite, Shadowbite, and Rain of Death use the same buttons as Burst Shot, Refulgent Arrow, and Bloodletter.
On my supportive jobs I tend to think of F as the oGCD heal button and V as the oGCD mitigation button, and Shift is for AoEs. To keep that mentally consistent on Bard Shift+F is where Nature’s Minne goes, and Shift+V is for Troubadour.
Machinist (MCH)
Machinist is a high APM job but has relatively few actions. This means you can fit most of what you need on simple unmodified keybinds and use a single modifier hotbar as needed.
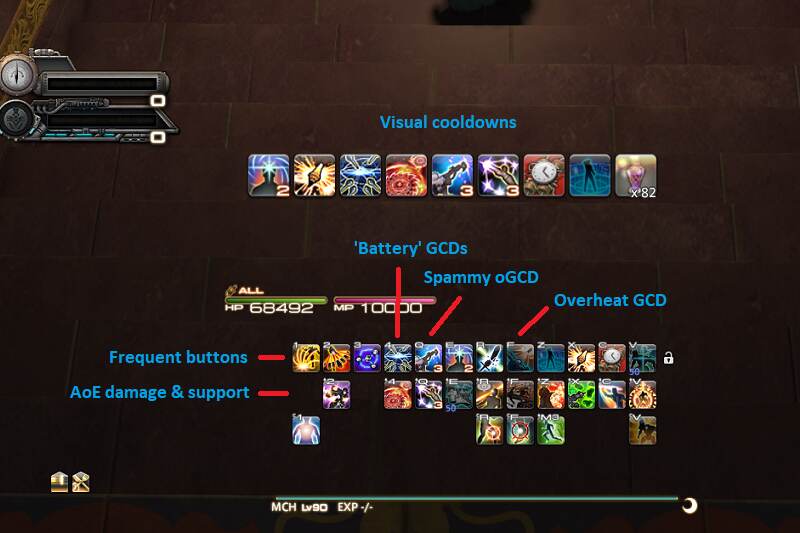
Heat Blast is your most frequent GCDs, followed by your 1-2-3 combo and then Drill and Air Anchor. Gauss Round and Ricochet see the most presses among oGCDs, but Hypercharge and Reassemble should also be somewhere comfortable.
I’ve placed Ricochet and Chainsaw on the Shift-modifier hotbar to align with my mentality of AoEs on Shift, but if you prefer to keep them unmodified because of their relative frequency there are definitely swaps that can be made with Dismantle (R) and Barrel Stabilizer (Z).
I keep Role actions the same as much as possible, so Second Wind, Tactician, Head Shot etc. tend to be in the same spots as other jobs.
White Mage (WHM)
White Mage tends to be on the simpler side when it comes to button presses, so let’s look at a hotbar layout for them.

White Mage has generally low APM at max level, and also a low number of unique button presses. In a boss fight setting for example many of your skills go completely unused (Cure I, Esuna, Medica, Repose, Holy).
Put your most frequently pressed buttons in comfortable keybinds (in my case the unmodified top row). Glare and Dia are common GCDs, while Assize and Divine Benison are oGCDs on short cooldowns. I also find it especially useful to slot ground placement skills (Liturgy, Asylum) on unmodified keybinds so I can double tap to quickly place them where I’m aiming.
Scholar (SCH)
Let’s take a look at an example layout using one of the jobs with the most buttons to assign – Scholar.

I’m by no means a Scholar main but these are the categories that made the most sense to me after playing around with it in level 80 raids.
The general idea I had was to put the most frequently reached for skills at the top (no modifier so they’re easiest on your hand) while assigning most keys a category (e.g. ‘F’ for Fairy Gauge spenders).
When possible, these categories feel similar to my other job categories on the same keys to make transitioning between them smoother: common GCDs on 1-3, job gauge spenders on ‘Q’, buffs on ‘E’, role actions on ‘R’, etc.
Shared Hotbars
I share hotbars 5-10 across all my Jobs. I use two of them for actions. The first one has actions I always use keybinds for like Sprint, Mount, Limit Break, and a macro to examine someone’s character (/c <mo>, bound to Ctrl+Mouse3).

The second hotbar has out-of-combat actions I always click on like Gysahl Greens to summon my Chocobo Companion, Materia Extraction to get some materia from my fully spiritbound gear, and shortcuts to windows I use a lot like Party Finder and the Challenge Log.

I also use three hotbars for a menu system macro I use to switch Jobs easily. This takes advantage of having multiple HUD layout slots, and simply switches me to the layout with those three hotbars front and center.
Hotbar Display
System > Character Configuration > Hotbar Settings > Display
You can “turn off” a hotbar by not displaying it, but you can still activate all the actions you’ve placed on it. I usually hide my extra hotbar with shared keybinds, because I don’t need it to be visible to know which button I use to limit break or summon my mount. These are keybinds I just get used to knowing.
I keep my menu macro hotbars turned off on my main HUD layout, and have a separate HUD layout where they are pretty much the only things displayed on the screen.

I also turn off displaying hotbar numbers to declutter the screen a bit. I disable hotbar cycling because that can really mess you up if you hit it accidentally in combat, and I diable drag-and-drop repositioning because dammit I had that hotbar just where I wanted it!
Hiding Empty Slots
As you can see, one of the tickbox options lets you hide unassigned slots. This just cleans up the screen a little bit, especially if you use an enlarged hotbar to put your important cooldowns closer to the middle of the screen, which I like to do.
It’s kind of like the opposite of my hidden hotbar with keybinds. This would be a hotbar on display, but with (mostly) no keybinds. I do happen to keybind my dash action and also have it on the big hotbar, since that’s useful to see for many Jobs that have a damage-dealing dash.

For Jobs like Bard, Red Mage, and Dancer, I find it much easier to have the proc skills up here so I don’t miss out on them.

This enlarged hotbar is another one of those things that people customize to fit their tastes. I’ve seen a lot of people use a different hotbar orientation (3×4, 4×3, etc.) and even use two hotbars on either side of their character. Whatever floats your boat!
Summary
I hope this has given you a few ideas of what’s possible when it comes to setting up your own keybinds and HUD layouts. Don’t be afraid to try stuff out on a new HUD layout save slot and see what works and what doesn’t.
If you have any layout tips that were real game-changers for you, let us know in the comments.


